Riveted Spider Pendant and Charms Tutorial Part Two:
 |
| Dimensions of pendant are 3 1/4" long by 1 1/4 " wide. Dangle adds about 1/2" to the length |
Hope
you all had fun playing with texturing and practicing your riveting
technique. This week we will dive into making the actual project
components and putting them all together to create the Spider Pendant
and Charms. This week I will go over how I stamped words on the square
washer as well as on the round blanks. I will also go over punching
holes in charms and riveting them. For the purposes of this tutorial it
is assumed that you have already textured, antiqued, and polished a
number of the square and round brass and copper stamping blanks.
Before
I get started I’d like to talk a little bit about sheet metal gauges
and which is best to use for what type of project. Most of my
experience is with 24g sheet metal. This is the “go to” gauge for using
as your base metal. It is malleable enough to texture but sturdy
enough to handle having things riveted to it and be worn as a bracelet.
I do not recommend using the 26g as your base pieces, it is just too
soft. I mainly use 26g to make what I call word charms that can then be
riveted to a 1x1 inch blank (which is 24g) or heavier gauge sheet
metal. I find it only takes one or two strikes with my short stubby
hammer to get nice clean images and words on the 26g sheet metal.
Supplies you will need:
Bench Block
and pad, I use a 2.5 x 2.5 bench block, the pad is optional but it
helps cut down on the noise made when using the block (an old cut up
computer mouse pad works as well)
Chasing Hammer
Rubber Mallet or Rawhide Hammer
Short stubby utility hammer or 1lb or 2lb brass mallet
Chain and round nose pliers
Flush cutters
80 grit nail file, metal file, or fine grit (330 or 600 grit) sandpaper
Pro-polish pads
Ultra-fine sharpie
Drafting or graphing ruler
Alcohol wipes (used for getting finger prints and sharpie markers of the metal)
Optional Supplies:
Texture Hammer (s)
*More Alpha Stamps Products used are listed below each example
Riveted Spider Pendant
Alpha Stamps Products used for the Pendant and Necklace:
Antique Bronze Spider Charm Set
one of the large ones, a note about the sets from Leslie “these come in
sets of 5 charms but not all the sets are the same. You will get a mix
of 5 different spiders... but not sure which of the 9 shown in the
photos will be included” I got lucky and got the skull body spider,
isn’t he cool?
1Pewter Spider Charms (or you can use on of the small spiders from the Antiqued Bronze Spider Charm Set, but I liked the contrast in metals)
Bead dangles for pendant and necklace:
Step One: Preparing the 1x1 square copper washer
 Before
we can stamp the words, we need to mark where the 6mm rondelles will go
as well as the spaces for the words. I am going to warn you, I am not
a ruler person. I have never learned how to use a ruler properly,
hence why I use a graphing ruler for everything. I know the rondelle is
¼” wide, how do I know this? I set it on my ruler to measure it (okay I
can use it for simple measurements). It fits perfectly in a ¼” by ¼”
square on the ruler grid.
Before
we can stamp the words, we need to mark where the 6mm rondelles will go
as well as the spaces for the words. I am going to warn you, I am not
a ruler person. I have never learned how to use a ruler properly,
hence why I use a graphing ruler for everything. I know the rondelle is
¼” wide, how do I know this? I set it on my ruler to measure it (okay I
can use it for simple measurements). It fits perfectly in a ¼” by ¼”
square on the ruler grid.
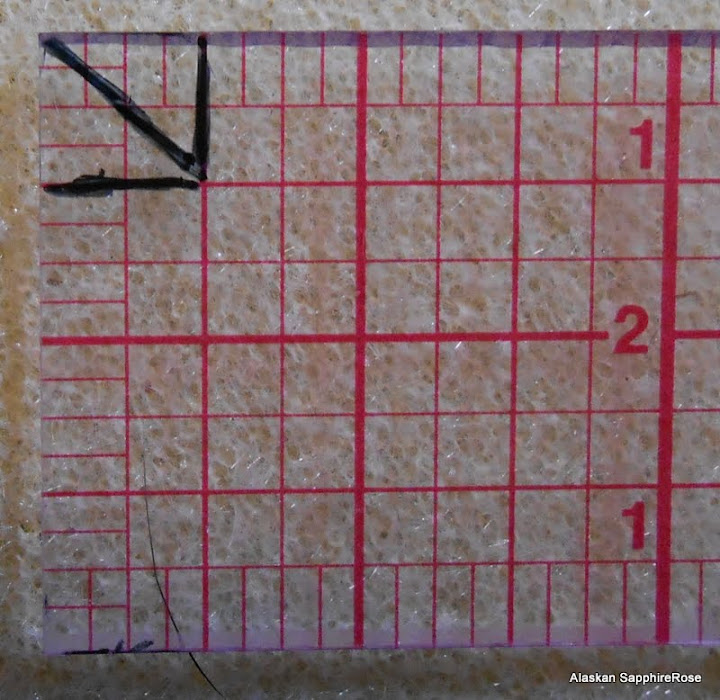 I marked the corner grid on my ruler with a
sharpie marker as well as drew a diagonal line through the center.
I marked the corner grid on my ruler with a
sharpie marker as well as drew a diagonal line through the center.
Starting with one corner of the square washer, making sure it was on
the diagonal, I lined up the marked grid on my ruler making sure the
diagonal line was centered in the corner of a washer. I then drew lines on each side of the ruler to mark the corners. I did this for all
four corners.
There
is about ½” between the lines to stamp your letters in. Stamp the
words before you punch your holes as stamping letters can distort the
rivet holes. To stamp the words creepy crawly place the square copper
washer so it’s diagonal on a bench block (remember no pad). Take the
first letter punch, hold it so the letter is facing you upright (the
same position as if you were stamping a word on a straight line) and
center it between the two sides of the washer, making sure no part of
the letter is hanging off the edge of the washer, strike the punch with
your utility hammer or brass mallet (DO NOT USE YOUR CHASING HAMMER FOR THIS STEP, IT WILL MAR YOUR HAMMER AND RUIN IT).
See
how the letters are at the perfect angle, that’s because placing the
copper washer on the diagonal places it at the correct angle for perfect
letter placement. Repeat until you have the words creepy crawly
spelled out between your marked lines.
Remember you may need to
play with placement of your punches to learn how they line up. Hopefully you were able to get some practice in with your set of metal
alphabet punches as you really need to practice so you get to know them
and become friends with them. I’ve had mine for three years and we
still have occasional disagreements. This technique really is all
about practice practice practice.
Now
make the rivet holes and punch them in the four corners of the washer.
I just eyeballed my holes, making sure they were centered between the
marks. After the holes are punched clean the piece with an alcohol wipe
and antique it. Your copper washer should look similar to the photo
below.
 |
| For
this sample I used aged bronze Metal Patina from the Treasured Heirloom
set . I dropped it straight onto the washer from the bottle and wiped
it away with a small piece of paper towel. Set aside to dry. This is a
great alternative to using liver of sulphur and a great way to add
color to your pieces. |
Step Two: Preparing the first 1x1 square blank for riveting with a charm
Punching
holes in charms is really very easy. All you need is the double sided
screw punch and charms that will fit into the punch. I highly recommend
using the double sided screw punch for punching holes in charms. The
1.5 mm or 1.8mm metal punch pliers are not up to the task of punching
holes in charms and you may ruin them. You may be asking why punch
holes in charms when they have loops? Well sometimes those loops are
not in the right place or are facing the wrong direction for the design
of your project, If that is the case you can simply use flush cutters
and nip off the loops (as you will see I did in some of the other
charms).
Lets
begin punching our first charm. I was lucky and got the skull body
spider charm. I knew the minute I saw him, I was going to punch out the
three divots in his feet and use them as rivet holes. Remember for
riveting purposes you want to use the small 1.5mm side of the screw
punch to make your holes. Carefully insert the spider charm into the
punch, line up the first divot and screw the punch down creating a hole.
Remember you don’t want to screw the punch down all the way, you just need to go far enough to punch a hole in the charm.
See wasn’t that easy, like cutting butter with a warm knife. Okay
more like cold butter with a cold knife, but it wasn’t as hard as you
thought, was it?. Repeat this for the remaining two holes.
 |
| Your charm
should now look like this |
Now
mark the rivet holes on the 1x1 square blank, I used a brass blank.
Lay the charm on the blank so the loop hangs off the corner (this is
going to become the bail), using an ultra fine sharpie mark the three rivet holes.
Next mark the rivet hole for the copper washer. Lay the copper washer
on top of the square blank like in the photo below and mark the rivet hole
with the sharpie marker.
Now punch all four holes.
 |
| your blank should look like this |
Step Three: Riveting a Charm
Riveting
a charm is pretty simple. Just remember riveting is a gentle tap, tap,
tap, not pound, pound, pound. You only need enough force to spread or
flare the rivet. If you are worried about harming your charm, you can
pad the top of your bench block with a small scrap piece of soft
leather. Using the charm you just punched the three holes in feed a
rivet through the middle hole and the corresponding hole in the square
blank. Flip the piece over, pinch the stack together so it is tight and
trim the rivet down to size, remember you only need about 1 mm to 1.5
mm of rivet, this rule doesn’t change because you are riveting a bulky
object. Carefully set the pieces face down on the bench block. You may
need to apply some pressure to the piece on the bench block as the
rivet will slip back into the hole. Now set the rivet with the riveting
hammer or chasing hammer. Do not set the rivet completely.
The charm may slide a little bit and you need a little bit of play to
be able to slide it back into position. See wasn’t that easy? Now set
the remaining two rivets and go back and finish setting the first rivet.
Remember to take the rounded end of your riveting hammer and smooth
out the back of the rivets to make sure you have completely set the
rivets. Congratulations! You have just riveted your first charm.
 Lets
complete the third component. For this you will need 1 1x1 inch brass
square blank, 1 ¾” inch round copper blank, and the pewter spider charm.
Start by punching a hole in the round blank. For this charm you will
use the loop that is attached to the charm. Place the spider charm on
top of the round blank where you want it and mark the hole with a
sharpie marker. Next punch the hole with either the double sided screw
punch or the metal punch pliers. Now mark the rivet hole on the square
blank and punch that hole. You will also want to punch the rivet hole
on the top corner of the piece for the copper washer. As in the earlier
step mark and punch that rivet hole. If you are going to add a bead
dangle to the bottom you should punch that hole as this time. Use the
larger side of the double sided screw punch centering it in the bottom
corner and punch the hole. You should now have two 1.5mm rivet holes
and a larger embellishment hole. Feed the spider charm and a ¼” rivet
and set the rivet. As before you may want to check the piece out before
you completely set the rivet to make sure everything is lined up the
way you want.
Lets
complete the third component. For this you will need 1 1x1 inch brass
square blank, 1 ¾” inch round copper blank, and the pewter spider charm.
Start by punching a hole in the round blank. For this charm you will
use the loop that is attached to the charm. Place the spider charm on
top of the round blank where you want it and mark the hole with a
sharpie marker. Next punch the hole with either the double sided screw
punch or the metal punch pliers. Now mark the rivet hole on the square
blank and punch that hole. You will also want to punch the rivet hole
on the top corner of the piece for the copper washer. As in the earlier
step mark and punch that rivet hole. If you are going to add a bead
dangle to the bottom you should punch that hole as this time. Use the
larger side of the double sided screw punch centering it in the bottom
corner and punch the hole. You should now have two 1.5mm rivet holes
and a larger embellishment hole. Feed the spider charm and a ¼” rivet
and set the rivet. As before you may want to check the piece out before
you completely set the rivet to make sure everything is lined up the
way you want.
Step Four: Assembling the three components into the pendant
For
this step you will need 4 ¼” rivets and 4 6mm black oxide rondelles.
We are going to assemble the piece from the top down. Starting with
the top charm (this is the one with a 1.5mm hole in the bottom corner),
feed a rondelle on to a rivet and then into the hole in the bottom of
the charm. Next insert this stack into the top hole of the square
copper washer, making sure your words are facing the right direction.
Just to reiterate, your stack should be, 6mm black oxide rondelle, top
component piece, square copper washer. Pinch your pieces together
tightly and trim the rivet to size. Place face down on the bench block
and set the rivet, making sure the square copper washer is correctly
lined up before you completely set the rivet. Next attach the bottom
component to the copper washer. Follow the previous step and set the
rivet. All that is left is to rivet the two 6mm rondelles to the left
and right side of the square copper washer.
Step Five: Stamped skull charms
To
create the stamped skull charm strips create a 3x3 grid (so you have 9
equal sized squares) on a 1x1 inch square brass or copper stamping
blank. To do this I used my graphing ruler and drew lines about ⅓ of an
inch apart with a sharpie marker, you really just want to make sure the stamping blank is divided equally. I then stamped a checkerboard
design using the skull and crossbones metal punch.
Wipe of the
marks with an alcohol wipe and antique and polish the blank. I then cut
the square into strips with metal shears and edged the three strips
with the rounded side of a chasing hammer (just like you did to edge all
your textured square blanks from part one of the tutorial). Use the
large side of the double sided screw punch and punch holes in the top of
the three strips (set one aside for future use).
Step Six: Making the bead dangles
For
the bead dangle you will need to make 5 bead wraps with the following: 2
faceted jet rondelles, 1 6mm lime AB cathedral bead, 1 6mm tangerine AB
cathedral bead, and 1 8mm round filigree bead. To make bead wraps
check out Teri Calia's great tutorial on how to make bead wraps. Open a
jump ring and feed the beads on so that the filigree bead is in the
center. Feed the jump ring in the hole you previously punched in the
bottom of the pendant and close the jump ring.
If you wish to make all the dangles for the necklace you will need to make the following wraps:
5 6mm cathedral lime ab beads (4 stacked with a 4mm copper rondelle, 1 without a rondelle)
4 6mm cathedral tangerine ab beads stacked with a 4mm copper rondelle
4 faceted jet rondelles
2 8mm filigree beads
2 stamped skull charms (I sandwiched them between 2 4mm copper rondelles) Photo close up of skull strips
Step Seven: Assemble the necklace
Using
a linked chain of your choice attach the completed pendant to the chain
with a brass jump ring, I used the larger of the thick gauge rings. I
then attached the bead dangles and skull charms with the thinner gauge
jump rings. To complete the necklace I attached a small bead dangle to
the clasp with a jump ring.
Stamping on the round
Lets have a little mischief and “mayham”
For this charm you will need the following materials:
1 1 Inch Square Stamping Blanks in copper or brass (textured)
1 1 Inch Round Stamping Blanks copper or brass (untextured)
3mm Alphabet Metal Punch Set
1 1/4 Inch Rivets
1 8mm Copper Rondelles - star
To
stamp on the “round’ as I call it, you first need to pick out your
words. Everyone who knows me, knows what a horrible speller I am. As
you can tell from the above “mayham”. A nifty trick for helping make
sure words are spelled correctly before they become permanently stamped
into metal, have a sticky note pad nearby with the words you want
written on to use a reference. I wish I had come up with this idea
before “mayham” came into my life. So misspelling aside, let’s begin
learning how to stamp on the round. It’s not as complicated as you
would think.
Really, it’s not.
With
a 1 inch round blank on your bench block (remember no pad for alphabet
or design punches!), place the “m” alphabet punch in the 12:00 position
on your blank, making sure the letter is facing towards you. Line up
the punch so it’s just at the edge of the round blank, but not hanging
off the edge, and strike with your utility hammer or brass mallet.
Turn
the blank counter clockwise ever so slightly so that you have a clear
spot in the 12:00 position, carefully line up your second letter, making
sure you are not off the edge of the blank and stamp/punch the “a”.
Continue to do this until you have completed the words mischief and
mayhem. I’m sure folks with engineering geometry degrees could use some
wonderous mathematical diameter + radius = pi equation, or some such
thing, and come out with a way to have perfectly spaced letters and
words. As you can see my letters are not perfectly spaced (heck
there’s even a misspelling) and sometimes they “wander” a little bit.
It is Halloween after all, having kooky letters just adds to the
overall charm of the piece. This is especially true if I haven’t played
with metal for bit. Don’t forget to antique and polish the blank after
stamping your words. To add some fun to the piece I used a ¼ inch
brass rivet stacked with a 8mm copper star rondelle, and riveted the
whole thing together through the center of the round stamping blank. I
did off set it a little bit on the square stamping blank so that at a
later date I could punch a hole in the top and make it into a pendant
and not punch a hole through the middle of my words.
Now it’s up to you to play.
Below are some other samples I created. If you want to turn these into pendants you can use some simple ball chain or even cording and turn any of these charms into a lovely pendant.
Spider pendant with bead dangle:
Materials used:
Creepy Spider Charm
Spider web and Skulls charm:
Antique Bronze Spider Charm Set
I used the small spider on the spider web charm, as you can see on this
piece I cut the loop off the charm and punched a rivet hole in the
charm
Metal Patinas Weathered Copper
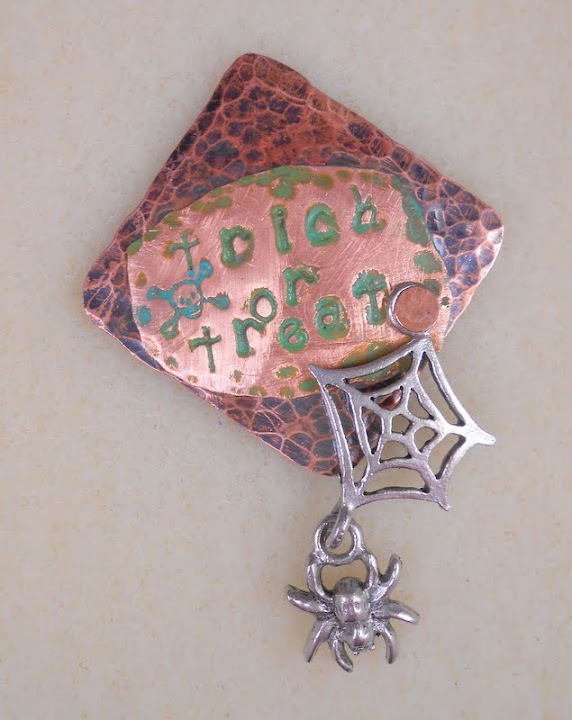
Trick or Treat
I
cut a 1x1 square out of the 26g copper sheet and stamped the words
trick or treat with alphabet punches and punched the skull and
crossbones. I then trimmed the words out making an oval shape. I
textured the edges with the rounded end of a chasing hammer, painted on
Metal Patinas in Weathered Copper, let it dry, then took a 180 grit nail
file and sanded of the paint. This gave the metal a cool satin finish
and distressed the paint.
Skull and Crossbones charms:
Below are two options for using that leftover skull and crossbones brass strip from the pendant project
leftover skull strip from pendant project
I
really hope you enjoyed my first metal tutorials and found them helpful
and inspiring. There are a lot of great resources out there for metal
and beads. You may want to check out a couple of my favorite sites
beaducation.com and fusionbeads.com. If you have any questions please
don’t hesitate to send me an email and I will try my best to help you
out!
I would like to say a quick thank you to my good friend and
beading/metal cohort Chris for being my guinea pig with this tutorial.