
Welcome to the Alpha Stamps Gypsy Fever Blog Hop!
AND
Gypsy Fortune Slider Tutorial
As I gaze into my crystal ball I see a prize in your future. Yes, you read correctly. If you visit all 4 Design Team Members' blogs and figure out the
fortune, you will have a chance to win over $100 of art supplies chosen
for the Gypsy Fortune Teller Swap! Look for the hidden words, unscramble your fortune, and leave a comment on the Alpha Stamps Blog and you could win an amazing prize package. But before you start your quest for fame and fortune, I'd like to share my Gypsy Fortune Slider and tutorial with you. So Collect Your gypsy treasures and have fun making your very own Slider.
 | |||
| Sneak Peek, what could your fortune be? |
Basic Supplies:
Pencil and ultra fine black sharpie
Ruler (I use a drafting ruler, I cannot function without my drafting ruler).
Scissors, nice paper ones
Heavy duty scissors to cut heavy weight chipboard
Pencil and ultra fine black sharpie
Ruler (I use a drafting ruler, I cannot function without my drafting ruler).
Scissors, nice paper ones
Heavy duty scissors to cut heavy weight chipboard
Glue/adhesive/and/or a Xyron Machine (I used studio multi medium in matte, I use both kinds, in the jar and the bottle)
Hot glue gun
Heat gun
Hot glue gun
Heat gun
Brown stamp pad, I used vintage photo distress ink pad
Wild Honey distress ink pad
26 gauge copper wire
Wire cutters, jewelry grade
Chain nose pliers
Heavy duty tool grade wire cutters that are kept in the tool box in the garage
Wild Honey distress ink pad
26 gauge copper wire
Wire cutters, jewelry grade
Chain nose pliers
Heavy duty tool grade wire cutters that are kept in the tool box in the garage
Here is a partial list of Alpha Stamps products used in the tutorial (additional items are listed beneath each step):
Heavy Weight chipboard
Distress Ink Pad - Vintage Photo
Fluted Ring Pull
Weekend Market 6x6 Paper Pad
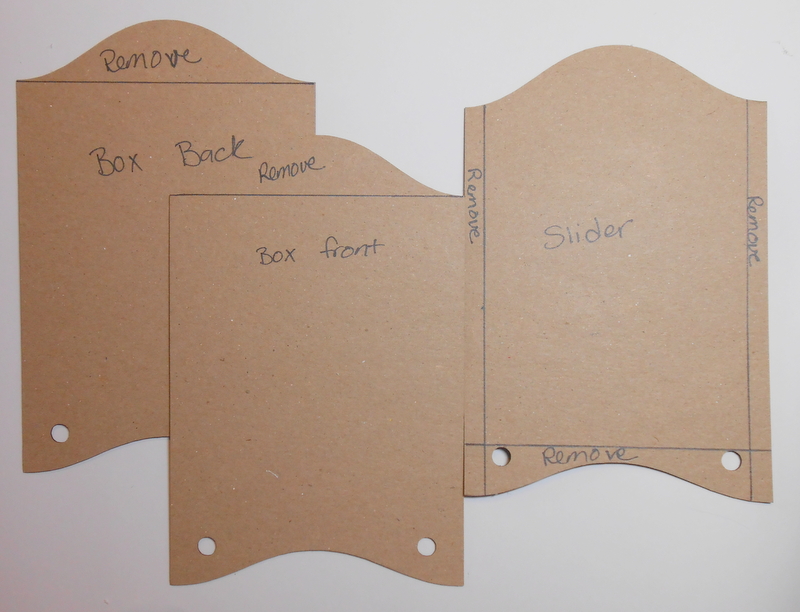
Step 1: Cut the curved top off of two of the concertina chipboard pennants to make a straight edge (these will become the front and back of the box). On the third pennant cut the bottom off just above the holes to make a straight edge. Then trim ¼” off each side of the third piece making sure to keep the arch centered. (this will be your slider piece).
Fluted Ring Pull
Weekend Market 6x6 Paper Pad
Step 1: Cut the curved top off of two of the concertina chipboard pennants to make a straight edge (these will become the front and back of the box). On the third pennant cut the bottom off just above the holes to make a straight edge. Then trim ¼” off each side of the third piece making sure to keep the arch centered. (this will be your slider piece).
Step 2: Pick out two coordinating papers, I chose papers from the Weekend Market 6x6 Paper Pad. (If you use a 6x6 pad you will use a total of four sheets, 2 for the front and back of the box and 2 for the slider. Trace your front and back pieces on the two papers you want for the outside of the box, and trace your slider piece twice (you will only be able to get one pennant shape per piece of 6x6 paper). Be sure to save your scraps you will need them later!
Step 3: Attach the papers to the two box pieces (you just need to cover 1 side of the box pieces) and both sides of the slider piece. (I used a Xyron for this with permanent adhesive). You may need to trim the edges a bit if the pieces are too big. Have little snip hangnails? A great tip I learned from fellow design team member Nichola Battilana, sand them off. I used a 180 grit nail file I buy at my local beauty supply store, or you can use sand paper. Then edge the sides with brown ink (another great tip I learned from Nichola), I used a blending tool and vintage photo distress ink.
Step 4: After attaching the papers to your front and back box pieces punch out the holes using a crop-a-dial or hole punch. Next using some of the scraps you saved from step 2, cover the inside bottoms of the front and back pieces making sure the paper goes up past the holes. I used the same paper that I used to cover the outside of box. Punch out the holes again after attaching the inside paper.

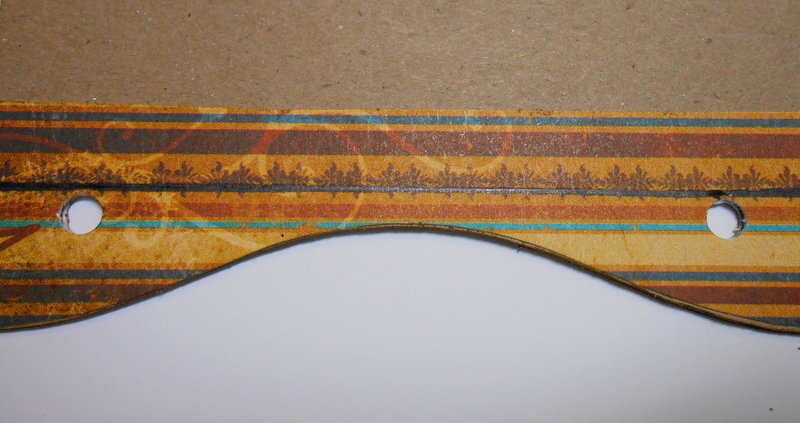
Step 5: To make the sides and bottom of the box cut three strips of heavy weight chipboard ¼ inch wide by 5 inches long and cover with the left over scrap papers from Step 2. (I ran one of the larger pieces through my Xyron and attached the strips to that). Trim around the strips.
I sanded the strips down to make sure the edges were straight. The big thing to remember here is that you want your insert to be able to slide in and out easily. I highly recommend using flat embellishments for the insert piece. Just be sure that the box for your slider will accommodate your embellishments, I learned this the hard way when my first box split because it wasn’t wide enough. I then trimmed one of the strips to fit the width of the front or back piece of the box (this will become the bottom piece of the box). I did this by laying the strip across the pennant and trimming it to fit.

Step 6: Attach the bottom of the box to the inside of the back first, don’t forget to edge your strip with ink before you glue it down. I drew a line on the inside with a sharpie just above the holes for my glue line (I find it easier to follow a line when gluing so I know where to place the glue).
 |
| It's hard to see but the line is there in black sharpie |
I then ran a fine bead of hot glue along the line and attached the strip on it’s edge. If your glue cools too quickly before you have the strip placed correctly just heat it with your heat gun and continue to get the strip set in place. You want it as straight up and down as possible.


Step 7: Attach the side pieces next. To get the correct length, I laid them down along the length of the pennant making sure they were snug up against the bottom strip and trimmed them to fit.

Edge your strips with ink and then run a fine bead of hot glue along the inside edge of the pennant making sure to run a bead of glue up the bottom strip (this will become the corner of your box). Again if your glue cools before you get the sides positioned correctly hit it with your heat gun and continue to get the strip set in place making sure it is as straight up and down as possible. Repeat for the other side. You should now have a three sided box with a bottom.

Step 8: Attach the front of the box by running a fine bead of hot glue along the top edges of the side and bottom pieces. Then place the top piece. You may need to use your heat gun again to help firmly place the top piece. Just work one side at a time heating as you go. To cover the unsightly hot glue I used the vintage photo distress marker and ran it over the glue. It covers the glue lines perfectly.

Step 9: Now comes the fun part where you let loose your creative spirit and embellish and decorate your box and slider. Just remember to edge all of your cut images with brown ink before gluing down (I used vintage photo for everything on my project).
 |
| Front of Box |
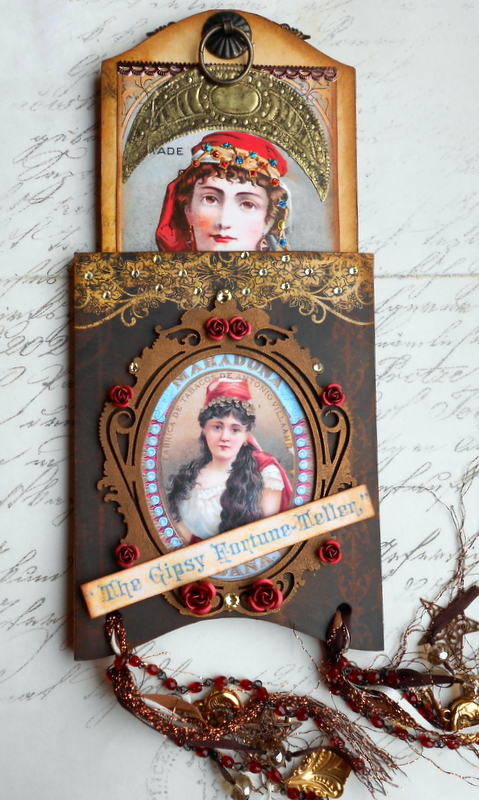
I used the following Alpha Stamps products for the front of the box:
Gypsy Beauty Collage Sheet
Gypsy Fortune Teller #2 Collage Sheet
Gypsy Beauty Collage Sheet
Gypsy Fortune Teller #2 Collage Sheet
Wood Flourish Frames (the large oval frame)
Metal Flowers (Roses) 4 6mm and 2 10mm
I first painted the frame with Adirondack Acrylic Paint Dabber in espresso. I used a paint brush to get into all the cutouts. After the paint dried I brushed on gilders paste in Antique Gold (I just used my finger). I then cut out the image of the gypsy I wanted framed. I laid the frame over the image and traced around the inside of the frame with a pencil. I cut out the traced image and glued it image side up to the underside of the frame using bottled studio multi medium in matte. I then glued the framed image on the front of my box making sure it was centered on the box. The holes in the frame made perfect little cups to hold the metal roses. The frame still need a little something more, so I dug through the stash of flat backed Swarovski Crystals and found the perfect yellow. I then glued more crystals in the centers of the flowers along the top of the box. I really love how the crystals add sparkle and dimension. I cut out “The Gipsy Fortune-Teller” text and glued it at an angle to the frame.
 |
| Back of Box |
I used the following Alpha Stamps product on the back of the box:
Gypsy Beauty Collage Sheet
Palmistry Collage Sheet
Gypsy Fortune Teller #2 Collage Sheet
Phases of the Moon Rubber Stamp
Fortune Text Rubber Stamp
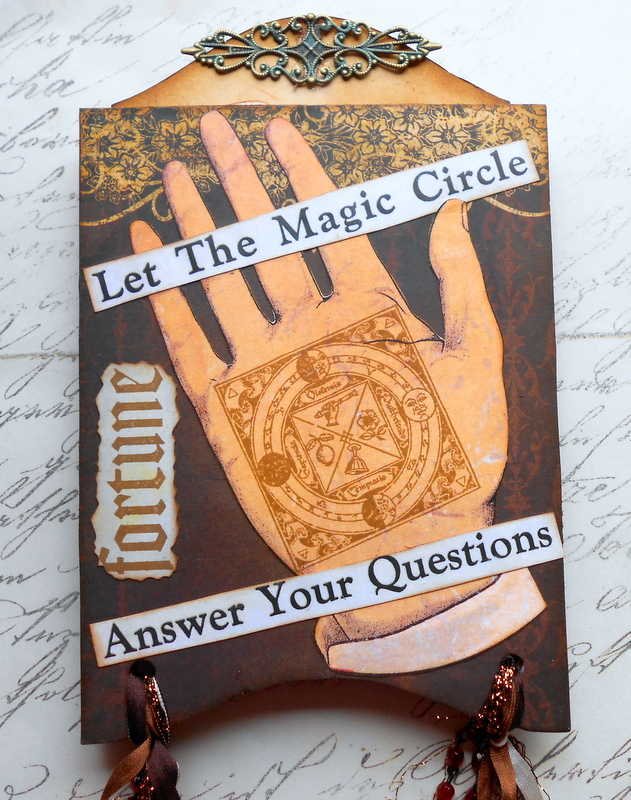
I cut out the large palm from the Palmistry Collage Sheet, edged it with vintage photo distress ink and stamped the Phases of the Moon image in the center of the palm (I also used vintage photo to stamp the image). I really love how the stamp looks like a henna tattoo. (The fortune text will be explained in the next step).
Palmistry Collage Sheet
Gypsy Fortune Teller #2 Collage Sheet
Phases of the Moon Rubber Stamp
Fortune Text Rubber Stamp
I cut out the large palm from the Palmistry Collage Sheet, edged it with vintage photo distress ink and stamped the Phases of the Moon image in the center of the palm (I also used vintage photo to stamp the image). I really love how the stamp looks like a henna tattoo. (The fortune text will be explained in the next step).
 |
| Slider Front, isn't she just beautiful? I just love this image, I must confess it's one of my favorites. |
Card/Slider Front:
The following Alpha Stamps Products used:
Gypsy Beauty Collage Sheet
Gypsy Fortune Teller #2 Collage Sheet
The following Alpha Stamps Products used:
Gypsy Beauty Collage Sheet
Gypsy Fortune Teller #2 Collage Sheet
Fortunes Collage Sheet
Gold Crescent Moon Dresden
Thin Looped Dresden borders in bronze
Gilders Paste - Black
Liquid Pearls in White Opal, Gold Pearl, Copper Pearl
I cut out the gypsy image, trimmed the label of the bottom and set it aside. I glued the image to the card/slider, making sure it didn’t go up into the curved portion of the chipboard pennant. I then glued a strip of bronze thin looped Dresden borders along the top and bottom of the image. I applied a thin coat of gilder’s paste in black on the crescent moon to help tone down the gold and bring out some of the wonderful texture. I glued the moon down above the gypsy. I then used liquid pearls in white opal to highlight the pearl necklace. I also used different colors of stickles and liquid pearls in gold and copper on the jewels in her headdress. I choose a fun fortune off the Fortunes Collage Sheet, aged it with a little Wild Honey distress ink and glued that on the bottom right corner.
 |
| Slider Back, I love the Large Game Spinners because you get such a great variety of shapes, sizes, and metals. |
Card/Slider Back:
Alpha Stamps Products used:
Gypsy Fortune Teller #2 Collage SheetAlpha Stamps Products used:
Brass Sun Rays
Gold Zig Zag Dresden Borders
Large Game Spinners (you will need three)
I cut out the gypsy image from the Gypsy Beauty collage sheet and three circles from the Gypsy Fortunes #2 collage sheet. I used the smallest hole punch on the crop-a-dial and punched holes in the centers of the three circles and attached the spinners using the brads that came in the package. I then played with placement of the gypsy and spinners making sure everything fit properly and that the spinners didn’t crash into each other before I glued them down. I cut out and attached the Queen of Fortunes text from the Gypsy Fortunes #2 Collage sheet and glued that to the left of the gypsy image, again making sure that neither image was in the curved portion of the pennant. I then attached a small strip of the gold zigzag Dresden to the bottom of the card. It screamed I need some more sparkle so I attached a brass sun ray and covered up the hole with a flat backed Swarovski crystal.
Ring pull:
To attach the Fluted Ring Pull I punched a hole in the center of the top of the pennant with a crop-a-dial, using the small hole punch. The ring comes with really long brad like attachments that I trimmed down a bit after bending them flat (the were so long they hung off the side of the pennant). I used regular wire cutters to trim this as the metal is really hard. You do NOT want to use your good jewelry wire cutters to cut these as you may damage them. I then glued down the attachments with bottle studio multi medium and used those little plastic coated clamps to hold everything down while the glue set (it took over night). To cover the attachments I glued a thin ornate filigree over them and let that set over night.
To attach the Fluted Ring Pull I punched a hole in the center of the top of the pennant with a crop-a-dial, using the small hole punch. The ring comes with really long brad like attachments that I trimmed down a bit after bending them flat (the were so long they hung off the side of the pennant). I used regular wire cutters to trim this as the metal is really hard. You do NOT want to use your good jewelry wire cutters to cut these as you may damage them. I then glued down the attachments with bottle studio multi medium and used those little plastic coated clamps to hold everything down while the glue set (it took over night). To cover the attachments I glued a thin ornate filigree over them and let that set over night.
 |
| I'm a charm-a-holic. I can never have too many charms. I wish you had blog-o-sound, this makes the greatest tinkling sound. |
Fringe:
Alpha Stamps products used:
Filigree Star Drop
Moon Face Charms
Ornate Brass Teardrops
4mm Silk Ribbons - Espresso, Cocoa, Cream
Rosary Chain in black/garnet
Alpha Stamps products used:
Filigree Star Drop
Moon Face Charms
Ornate Brass Teardrops
4mm Silk Ribbons - Espresso, Cocoa, Cream
Rosary Chain in black/garnet
Cut 2 8-10 inch pieces of each of the three ribbons. I had some bronze colored cording in the fiber stash so I also cut 2 8-10 inch pieces of that. I then took one of each of the pieces of ribbon and cording folded them over in half, and threaded them through the hole in the bottom of the pennant. To do this I used a thin piece of copper wire as a needle.
 |
| To make the copper "needle" just take a short length of the 26g copper wire and fold it in half (you could use any fine gauge wire, I just had copper on hand) |
I then brought the tails of the ribbons up through the loop and tightened the loop. I tied the charms to the ribbons making sure they were staggered. To secure the knots I dabbed a little bit of bottle studio multi medium on them with a tooth pick. I then frayed the cording with a toothpick and attached the rosary chain to the ribbon loops with the copper wire. I used jewelry pliers to make sure the wire was tightly twisted. I trimmed down the ends and tucked them under the ribbon loops.
Thanks for stopping by. I will be posting more gypsy art in the next couple of weeks. If you leave a comment on this post you could win a piece of my work. What's the prize you ask, well it's a secret and will only be revealed at the end of the blog hop. I don't think you'll be disappointed (it will of course be gypsy themed). Don't forget to visit other Design Team Members' Blogs and find the hidden words!


Beautiful project. I am in love with your slider box....never would have thought to do something like this.
ReplyDeleteSmiles~
Marilyn
I love this piece, especially all the detail and the different elements you used to put it all together. What a fantastic design!! Beautiful!!
ReplyDeleteTake care,
Diane
The spinner card is fun.
DeleteFabulous Fortune teller box!
ReplyDeleteLynn
Really nice work. I appreciate another idea of what to do with the pennants.
ReplyDeleteMonster Alice
cool idea! beautiful!
ReplyDeleteWhat a great slider. Thank you for the inspiration. I love little secret compartments and pockets in artwork. I would love a chance to win one of your art pieces. How creative!
ReplyDeleteThank you for sharing your tutorial.
carmenmolly5829@yahoo.com
I've actually seen this in person and the photo's don't do it justice!!! It's a lovely piece Shannon, keep up the good work.
ReplyDeleteJackie
A delightful piece! I love the game spinners - like a wheel of fortune!
ReplyDeleteThis is just the type of project I love to make and never tire of the theme. Thanks for sharing the tutorial and giving me new ideas to explore!
ReplyDeletePenny Meyer
P2MEYER225@cox.net
Gorgeous stuff :)
ReplyDeleteAmazing project and so intricate! I love all the pockets and secret niches, thanks for sharing.
ReplyDeleteI'd love to win a piece of your artwork. This project is amazing....I can almost hear the tinkling of the charms :)
ReplyDeleteRetta519@yahoo.com
Your Gypsy Fortune Slider is a huge hit. It looks like everyone who sees it, loves it, including me. I can see you put a lot of time and energy in this piece of artwork and it really shows. It's very polished and just really awesome. Thanks for sharing your artwork and for the inspiration I got after looking at it.
ReplyDeletewhat a stunning piece! all the little details are just wonderful! thanks for sharing the process and for the chance to win something you made.
ReplyDeleteYour art piece is beautiful!!!!! There are so many details I didn't know where to begin looking! Thank you so much for the detailed tutorial. I want to try and make one and hope it comes out as good as yours!
ReplyDeleteWow excellent post, i read this post very useful and unique information. I love this idea. Thanks for sharing excellent post with us.
ReplyDeleteSuch a wonderfully rich piece and an innovative idea. Thank you for the fabulous tutorial!
ReplyDeletethis piece is so unique.....love it.
ReplyDeleteBarbara Bird
MdStrwbery@aol.com
MdStrwbery.blogspot.com
This is so beautiful!!! Thanks for the tutorial too...but my projects are never as great as this! Fabulous colors and images!
ReplyDeleteLove this project - I plan to try something similar
ReplyDeleteThat is just fabulous!
ReplyDeleteHoly cow! What a detailed tutorial: Thank you!
ReplyDeleteYour gypsy fortune slider is unique and beautiful!
Hi, I have been inspired by your work! Love the little tins you did! I'm now a follower, thanks for the inspiration!
ReplyDeleteChristy
Your work is great Shannon, it's amazing and the tutorial is easy to follow. Love it!
ReplyDeleteAmazing work...I've got to try it soon! Thanks for your tutorial, you explain each step so nicely! Love your work. Winning anything you create would be too marvelous for words! Thanks for the chance!
ReplyDeleteThanks for sharing this beautiful and inspirational project! I appreciate the detailed tutorial very much!
ReplyDeleteterrific project! thank you for the inspiring tutorial!
ReplyDeletewow that is an amazing piece of work.
ReplyDeleteI have to be honest and say wow weee I dont know if my hands are capable of making something like that.You did a wonderful job on this and the tutorial is saved on my computer and I hope to be able give it a go sometime.
totally awesome.
Shannon, The tutorial was fantastic and easy to follow. Thanks for the tips. And for the opportunity to own a piece of your ART!
ReplyDeleteBeautiful work, and thanks for the tutorial...wow!!!Thanks for the fun and blog hop!!! "The cards" say You are a very successful and generous artist!! ;~)
ReplyDeleteAn amazing work!A wonder!
ReplyDeletewonderful tutorial!!
ReplyDeletelove this !!!
i am now a follower!!