Saturday, November 23, 2013

Festive Fall Wreath


Festive Fall Wreath

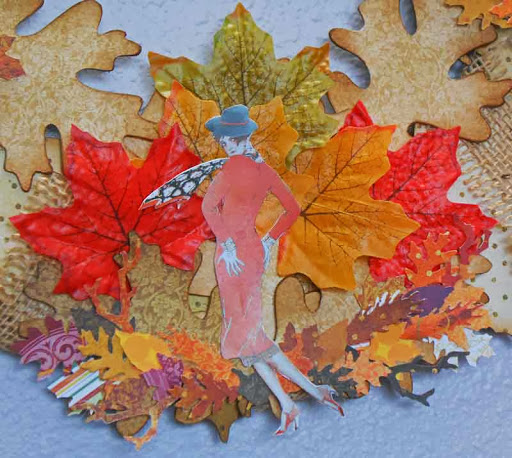
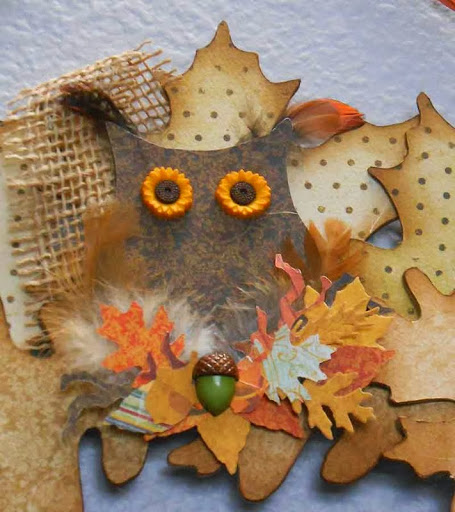
I created this fun festive fall wreath for Alpha Stamps.  I absolutely love the tufted owls, I am especially thrilled about how the sunflower buttons made perfect little owl eyes (I was literally squealing like a demented school girl when I saw how cute they turned out).  They are so adorable.  This project took many 180 turns and did not come out like I had originally planned. One thing I learned doing this project was to let go of the preconceived ideas I had and just let the process flow without those preconceived notions cluttering up my brain.  If I hadn’t done that the owls would never have come into being.
I covered 10 maple leaves with the double dot vintage chiffon scrapbook paper and 11 oak leaves with the double dot vintage decaf scrapbook paper.  I then edged them all with vintage photo distress ink using an ink blending tool.  I choose the neutral colors for the leaves so that the fun embellishments would stand out.
I then layed out the maple leaves in circle (but if you look closely the wreath has a bit on oval shape to it) and hot glued them together.  When making a wreath you want to lay all your leaves going in the same direction.  If you make a mistake and don’t get a leaf in the correct position you can heat the glue back up with a heat gun and move the leaf into the position you want.  I then used a length of the burlap ribbon that came in the fall fiber set and loosely wrapped it around the wreath at an angle.  I secured it to the back using hot glue.  
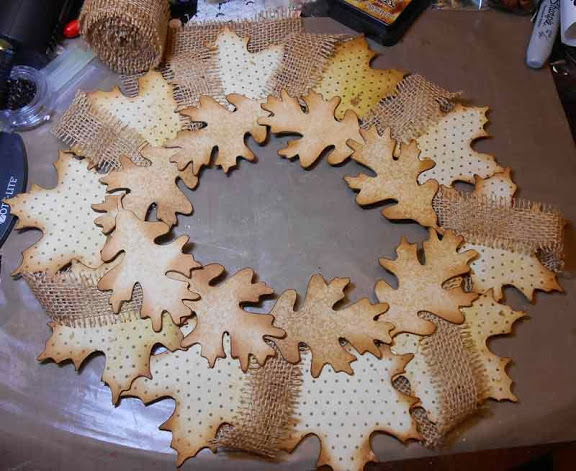
       
I then used 8 oak leaves and glued them to center of the wreath with a hot glue gun.  Again making sure they all were laying in the same direction.

I next cut two strips of the Double Dot Vintage Papers in Vintage Chocolate, Burnt Orange, Gingerbread, Maize, and Orange Citrus 2.5 inches wide by 12 inches long.  I also cut 1 strip 2.5 inches wide by 6 inches long from each of the Autumn Song papers.  I then ran all these strips of paper through the Vagabond machine using the Autumn Gatherings Decorative Strip Die (be sure to use the correct setup for the die cutting machine you are using).  I used an extended spacer platform and a pair of the decorative strips cutting pads.
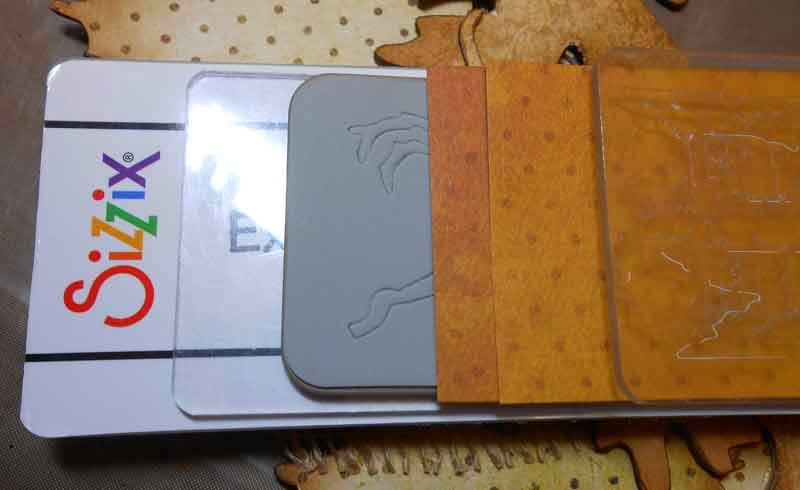
I would recommend running one layer of paper through at a time as I found that the strip wouldn’t cut entirely through two layers of the paper (even though the photo shows two).  As I cut the strips of paper I kept the shapes sorted by shape and size.  This came in very handy as I was building the little leaf perches and swag.
To make the owls I traced the owl shape on the scraps of Vintage Chocolate, Gingerbread, and Maize Scrapbook Paper that remained.  I rounded the bottom of the owl by using a stack of pan pastels (I found this to be easier than trying to cut around the intricate little owl wings on the chipboard shape that would just be covered by the perches.  I glued three of the larger birch leaf shapes from the stacks of leaves cut from the Autumn Gatherings Decorative Strip Die to make the tail feathers.  I then glued two matching small feathers from the Assorted Feathers to make tufted owl feathers on the heads.  I then glued the owl shapes cut from the Double Dot papers and made eyes by cutting off the shanks from two sunflower buttons and glued those on to the owls.  I then glued two larger feathers on the owl to make fun little feathered wings.  I set these aside to dry I as assembled the little leaf and twig perches for the owls.


I next made three little perches for the owls using the shapes I cut from the Autumn Gatherings Decorative Strip Die.  I started with two to three twigs as my base glued end to end and worked from the outside in gluing down leaf shapes starting with the largest leaves first.  I layered more twigs and smaller leaves as I worked my way towards the center.   I let the glue dry and then glued one to each owl.  I then cut the shank off an acorn button and glued that to the center of the perch.
I knew the wreath need a bit more pizzaz.  I cannot make a nice pretty bow out of ribbon, it’s just not in my arsenal of abilities so I decided to make this large piece for the bottom center of the wreath where a bow would normally go.  I started by making a fan from the three remaining oak leaves (which is mostly covered up but you can kind of see it peeking out from behind).  I then tucked some of the embossed leaves in and around the oak leaves.  I then made a larger leaf swag using the same steps as before to cover the entire length of the oak leaf fan .  I glued the swag to the oak leaf fan, picked this fun lady from the Falling Leaves Collage Sheet glued her in the center and then glued fan to the wreath using hot glue.

I then glued the owls in the 12, 3, and 9 o’clock positions on the wreath.  I punched two holes in the top of the wreath on either side of the center owl and tied some of the fun colored raffia from the fall fiber set and dabbed a little glue on the knots to secure them.


Alpha Stamps Supplies Used:


Wednesday, September 18, 2013

Gargoyles!

Today I'm sharing this fun 3D Gargoyle project I created for Alpha Stamps.  I started by taking two of the Gargoyle Front View Die-Cut Chipboard shapes and cut a slit in the top of one and the bottom of another.  Since I am not the best at measuring and such, I made copies of the gargoyle shape so I could have some practice pieces for making my slits as I didn't want to ruin the good chipboard ones.  I covered both sides of the chipboard gargoyle with background paper.  As I learned the hard way....cover your shapes with your background paper first and then cut the slits (I also tend to do things backwards).  I then used a blending tool and colored the edges with black soot distress ink.

Here's a side view showing how the two shapes are stacked together.
I took some of the black fibers from the Noxious Fumes Fiber set and wrapped it around the wire on the crow to hide the silver colored wire.  I then cut a small slit in the head of one of the gargoyles with an x-acto knife and glued the wire into it.  I really love how the crow is hovering over and observing everything.  (Or is he really there whispering naughty ideas to the gargoyles).

And here's a view of the backside gargoyle
-
The great thing about this project is it creates four little niches that you can add all kinds of fun things to.  As you can see I still have a bit of work to do, so I'll be sharing a little bit more with you in the next week or so.

Alpha Stamps Products Used:
Gargoyle Front View Die-Cut Chipboard
Gargoyle Faces Collage Sheet
Paris Post Collage Sheet
Cemetery Collage Sheet
Dead Tree Cut-Outs
Bat Cut-Outs
Spider and Web Chipboard Cut-Outs
Haunted Night Scrapbook Paper-Alpha Stamps is sold out now, but a great alternative is the Happy Haunting-Full Moon Scrapbook Paper
Noxious Fumes Fiber Set
Small Feathered Crows
Tiny Skull Charms Pewter & Gold
White Turquoise Skull Beads
Christmas Red Stickles
Cat Eyes - 5mm Yellow
Flying Owl Buttons


Saturday, August 24, 2013

Colorful Peacock ATC

I created this colorful Peacock ATC for Alpha Stamps.  I started with the House Shaped Die-Cut Chipboard which I colored with Spiced Marmalade Distress Paint.  I then used a swirl stamp and stamped with Picked Raspberry Distress Paint and Tarnished Brass Distress Stain.  I then added a Valance Curtain Die-Cut Chipboard that I covered with the peacock fan from Midnight at the Oasis Collage Sheet created by the very talented Lara Carson for Alpha Stamps.  Since the image was not quite large enough to over the whole shape I used some fun sparkly stickers to cover up the bare spots.  I then fussy cut the peacock image from the Peacocks Collage Sheet.  The background image is from the Wood Theatre Frame Collage Sheet and the fun palm fronds in the urn came from the Aladdin Collage Sheet.  To balance out the ATC I added a real peacock feather and some paper flowers that I colored using mini spritzers that I made using peacock feathers and spiced marmalade re-inkers.  I then spritzed Perfect Pearls Mist in Perfect Pearl to give the flowers some shimmer.

Alpha Stamps Products used:

The swirl Stamp came from the Tiny Textures stamps from the Tim Holtz Collection (CMS042).


Thursday, July 18, 2013

Mermaid Banner


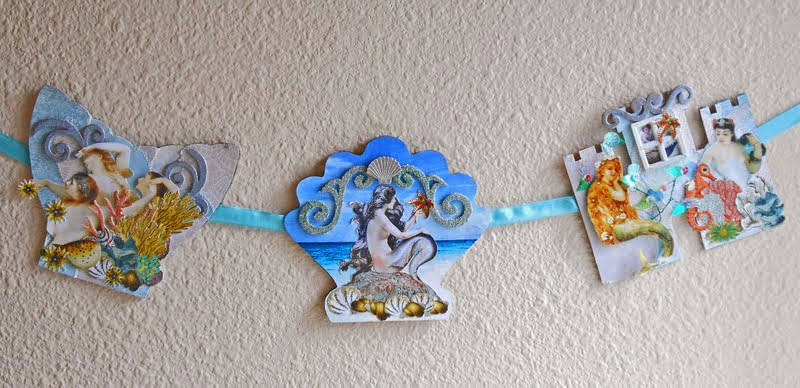
I admit I'm horrible blogger.  I apologize for not updating my blog for many, many, many months.  Unfortunately the first thing to go to the wayside when life reared it's challenging head was my blog.  I  had to take wee little break earlier this year while my dad was dealing with a serious illness.  Thankfully the Doctors finally figured out what was ailing him (after two hospitalizations) and he is doing much better now.  So thank you for sticking around and finally a new project to share with you.  I created this fun Mermaid Banner for Alpha Stamps using the new fabulous Die-cut Chipboard Scallop Shell, Sand Castle, and Mermaid Tail.


 To create the background for the mermaid tail and sand castle I ripped some of the Fresh Mini Paper Set into strips and sewed them together using a zigzag stitch setting.  This is the first time I've ever used a sewing machine and it was easier than I thought it would be, of course mom helped a lot! 
I have to admit my favorite part of the entire project was the little garden I created using  Colorful Flower Sequins and the Seashell Sequin Mix.

Alpha Stamps Products Used:


Tuesday, December 18, 2012

Random.Org Has Spoken

Random.org has spoken.  Congratulations Erin Kennedy you are the winner of this fun Frenchie Ornament and your very own copy of the Vintage Frenchies Collage Sheet.  Contact me at
aksapphirerose@gmail.com with your contact info so I can get your prize in the mail.

I would like to say thank you to everyone who left a comment.  I really enjoy reading all your comments and appreciate all the kind words.  


Tuesday, December 11, 2012

12 Frolicking Frenchies

On the 12th Day of Christmas my true love gave to me 12 Frolicking Frenchies.

(And Happy 12-12-12) 

Alpha Stamps has been hosting a 12 Days of Christmas extravaganza.  I hope you have enjoyed all the fabulous work created by the Design Team and Guest Designers.  Today I get to share my project with you and it’s one that I’m super excited about.
 
I used the Set of Layered Chipboard Ornaments from Alpha Stamps to create this fun mobile.

Front side of Ornaments 1-4 


I started by covering the chipboard ornaments with coordinating papers.  I used papers from the same collection so that they would all go together.  I loved the vintage feel to these papers and they went perfectly with the Vintage Frenchie Collage Sheet.  I then went on an embellishing spree and added all kinds of paper flowers, charms, cut outs, dresden borders, and glitter.  (see below for a complete list of materials used). 

Back side of Ornaments 1-4

For ornaments 1-4 I used 2 sets of ornaments and created two-sided framed ornaments.

Front side of Ornaments 5-8

Back side of Ornaments 5-8

For ornaments 5-8 I used one set and used the center cut-out. I mounted the cut out to the back of the ornament with foam mounting tape to give it some dimension.  I also used a gold krylon marker and vintage photo distress ink to color the edges.
For ornaments 9-12 I created window ornaments with the Layered Masonite Ornaments and ICE resin (I used one of each shape).  I will share with you how I created these ornaments since it is fun and really simple.
Cover the back of your images with some decorative paper, as you can see from the photo above you will be able to see through the ornaments.  I used some gold foil tissue paper from my Christmas wrapping stash.  I used rubber cement to glue the papers together.  Once the glue is dry trim around your images. When using images in resin I  recommend using the card stock sheets from Alpha Stamps as the images are color safe and don’t run in the resin.
Cover one side of the ornament with blue painters tape (the tape does not stick to the resin).  You want to make sure the tape is taught and sealed around the ornament opening.  I held the tape to the top of the ornament with one finger and pulled it tightly down towards the bottom of the ornament..  It will take two pieces to cover all the ornament openings so make sure that the seam is pressed together, you don’t want any gaps in the seam for resin to leak under.  Then rub around the inside opening of the ornament to get a good seal.
 
I sprinkled a little glass glitter first so that the collage images would not stick to the tape and placed my trimmed images and charms in the ornaments.  When you are happy with how the ornaments look set them off to the side.  I work on a piece of cardboard so that way if there is any spills or leaks my working surface doesn’t get ruined by the resin.

Now it’s time to mix up a batch of resin.  To do all four ornaments I used ½ oz each of resin and hardener.  My 4 oz bottles of resin came with some measuring cups and stir sticks.  Before pouring anything I marked my little mixing cup with a sharpie for easy measuring  It is important to have equal parts of resin and hardener.  I first like to pour the resin and then the hardener, that way if I pour a little too much resin I can add a little more hardener.  VERY gently mix or fold the resin and hardener together this can take up to 10 minutes or longer.  You don’t want to create air bubbles in the resin.  The resin is mixed when it is completely clear.  Let the resin rest for about 5 minutes to get rid of some of the air bubbles, you can gently tap the cup on your table to help the air bubble rise to the top and pop. (Sorry for the blurry image)

Let’s begin to pour the resin.  I poured my resin into a small plastic squeeze bottle that my local bead store carries (it’s a one use deal, not very earth friendly, but it really is a great tool for pouring just the right amount of resin).  
When using paper images in resin, I like to put a thin layer of resin down first and then float the image into the resin, this ensures there is resin underneath the image.  Remove your images (here you see I removed the charm as well).  Start in the center of an ornament gently squeeze the bottle and create a spiral of resin.
When there is a thin layer of resin filling the ornament set your image into the resin.  You will need to poke it down into the resin, I did this with  a snippet of left over wire, but a round toothpick works just as well.  Remember not to push it all the way down to the tape, it is really important to have resin underneath the image.  If you removed any of the other components, put them in now and arrange them how you want using the toothpick or wire.  Add more resin if needed.  Start with just a drop or two and let the resin spread out.  You don't want to overfill the ornaments and have resin spilling out over the top.  You want to make sure every component is covered in resin.  Let the items set  for about 5 minutes to see if any air bubbles formed.  If there are any bubbles you can gently move the it to the side of the ornament to pop it.
I then sprinkled more glass glitter on the top of the ornaments and set them aside to cure overnight.  A very important  DO NOT do this note.   DO NOT CURE YOUR RESIN IN A TOASTER OVEN.  The first batch of ornaments I did bubbled so badly I had to discarded them.  It’s best to let these set and cure on their own.  

I gently removed the tape after about 6-8  hours of curing. The resin was still soft but could be handled if I was gentle with it.  Since I’m an impatient crafter I went ahead and fired up my toaster oven to 150 degrees and cooked the ornaments for 10 minutes.  I still got a little bubbling but it helped to harden the resin enough that I could start to embellish the ornaments.

I added fold over bails and glued them with E6000. I then added mini rose buds in ivory that I dipped in Tattered Angels Glimmer paint in Chandelier and clear acrylic bead sprays. I also rubbed on some Gilder’s Paste in Antique Gold and since they still needed a little something more I painted on a thin coat of the Chandelier glitter paint.  I also added some of the masonite tree cut outs that I covered in avocado and dark chocolate liquid pearls.
I assembled my mobile using 14g copper wire that I colored with Victorian Gold Metal Patina Paint from the Treasure Heirloom Collection.  To do this I applied some of the paint to one of those little felt pads that comes with the ranger alcohol ink blending tool and ran the wire through it.  It’s a little messy but the color turned out fabulous and fits the vintage feel I was going for with the mobile.
I cut the wire into 14 inch lengths and added a loop to the center.  I did this by marking the center of the wire with a sharpie markerI then placed that mark in the center of my round nose pliers as close to the box of the pliers as possible.  I bent the wire down in a "U" shape (photos to come), and then pulled the right side over to the left and the left side over to the right.  To make sure the wire was balanced I placed the loop over my pliers.  If you find the wire is unbalanced, you can trim a little wire of the heavier side.

To attach all the different arms of the mobile together I made two sided eye loops.  I had to tweak them a little bit to get the arms to turn right.

I then attached an ornament to each end of the wire with chain and jump rings.
I had one pair of ornaments that was very unbalanced.  To fix this problem I added a couple of the cast brass beads with loops (I think they look great and fit in well with all the other bits and pieces).
And just because they turned out so great here is a close up of the glammed up paper flowers that I dipped in the Chandelier glitter paint.

After assembling the mobile I kept going back to it because "something" was missing.  It finally hit me, there needed to be a pretty dangle in the center.  I created this sparkly snowflake from Swarvoski crystals and a metal snowflake shape purchased at my local bead store.

Here is a close up of the crystal snowflake.
Thanks for visiting!  I hope you enjoyed my project and if you haven't already go check out all the fabulous work created by the Design Team!

Here is a list of all Alpha Stamps products used:
Collage Sheets:
Vintage Frenchies
Santa and Children
Winter Birds
X-Mas Cards & Small Books
Snow Collage Sheet
Snug in their Beds
Angel Sisters 
Set of Layered Chipboard Ornaments
Layered Masonite Ornament -Long Scalloped
Layered Masonite Ornament-Wide Scalloped
Layered Masonite Ornament-Classic
Layered Masonite Ornament-Star
Star Mix Cut-Outs
Pine Tree Cut-Outs
Reindeer Antlers Stencil
ICE Resin
Antique Bronze Christmas Charm Set
Brass Snowflake Charms
Candy Cane Charms
Christmas Bell Charms
Large Brass Snowflake with hole
Holly Charms
Small Fold over Bails - Antique Gold
Clear Acrylic Bead Sprays - Asymmetrical and Teardrops
Glittered Holly Berries - Red and Green
Mini Rose Buds - Ivory
Old Fashioned Roses - White
Small White Apple Blossoms
Tiny Paper Roses - White
White Roses with Heart Shaped Petals

BONUS!!! 

Leave a comment on this blog posting Dec. 12-Dec. 16, 2012 and you will be entered to win this lucky 13th Ornament I created (it's not called a bakers dozen for nuthin') and your very own copy of the Vintage Frenchies Collage Sheet!

Saturday, December 1, 2012

12 Days of Christmas at Alpha Stamps

This year Alpha Stamps is hosting the 12 Days of Christmas!  Yep, your eyes read that right.  The fabulous Design Team and been busy busy busy creating some great art.  Over the next 12 days a different Design Team Member's art will be revealed for all to see.  I have been extremely busy the last few days getting my project done.  NO peeking now, you will just have to wait for day 12 to see mine.  In the mean time go see what the fabulous Caroline created for day One!